
RV-8 and the 2026 Condition Inspection, Part the Third
- Steve
- Apr 5
- 10 min read
Updated: Apr 12
In case you really can't sleep, or want a refresher on what happened in earlier parts, Part One can be found here, and Part Two can be found here.

Saturday, 4/4/26 dawned with much hope. I had received the correct gaskets from Aircraft Spruce, and they actually arrived a day earlier than they were promised. Even better, I got everything that I ordered exactly how I ordered it. I figured I would get the Governor adapter installed and finish cleaning the lead out of the crank hollow quickly and be able to move on to other things. But, alas, that was not to be. To save you the suspense, I will start by saying that I did, once again, emerge victorious, but it was by no means an easy victory.
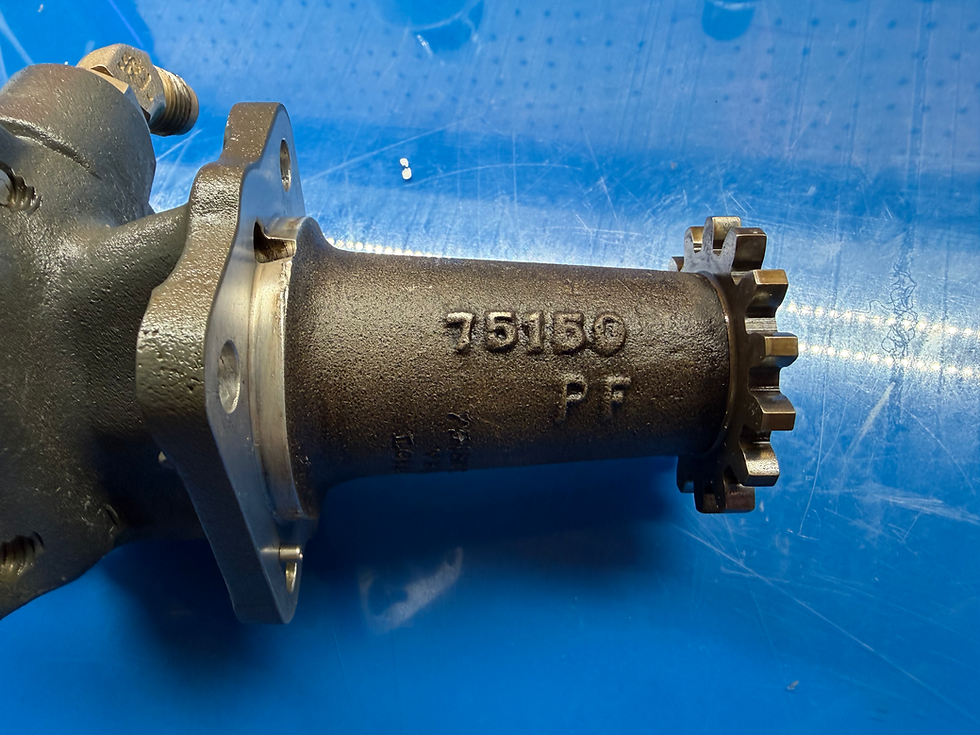
I started by taking a new gasket and applying some Dow Corning DC 4 as a release agent / lubricant and put the gasket on the studs on the accessory case. I had never used the stuff before, but the guy that used to maintain the airplane for the guy that I bought it from used to use this and I gave it a try after I bought it and I like it for a gasket lube. I haven't tried it on O-Rings, but it should work there as well. I also don't know how it will stand up over twenty years or so, but I probably won't be in a position to find out.
After that, the next simple step was to put the adapter back into the accessory case. This is where the plan fell apart. I got it in, but it wouldn't mate flush with the accessory case. The best I could do left about a 1/16" of a gap between the adapter and the case and it just wouldn't go any farther. I thought maybe the gear teeth weren't fully meshed so I tried to gently rotate the gear, but that didn't really help.
After scratching my head for a while, I remembered that there is a roll pin in the adapter that goes into a hole in the case. I thought maybe that was for some reason not going into its little hole, so I pulled the whole thing back out and looked at the pin. I got my calipers out and measured the pin and then found a tiny ball gauge so I could check the hole and there was ample clearance for the pin in the hole. When that didn't deliver any clues, I then measured the length of the pin to match against the depth of the hole and there was plenty of clearance.
This came out of there just a short time ago, so none of this should be causing a problem, but I was grasping at straws trying to find a culprit. I went back to the airplane to try again and guess what? I got the same result. There is nothing special on the gear and there are no marks that indicate that it has to go in a certain way, so I tried rotating the gear to see if I could find a position where it was happy to go into its home, but no luck. Every position I tried yielded the same result. What is the definition of insanity, per Einstein anyway?
As I played with it some more I gained a little more knowledge. I found that by moving it around I could get part of it to mate up, like one side or the other, or the top, or the bottom, but not all of them. Since this is a casting going into another casting, and I bet they are all very expensive, I really didn't want to apply any force as I figured it should just slide in there. Generally speaking, if something like this won't go in without force, it means something is wrong and applying force will only make things worse. The problem with speaking generally, generally speaking, is that it doesn't apply to every situation that could arise. Such as this one.

At this point I was desperate enough to read the directions. I pulled out the Lycoming overhaul manual and looked up the section for installing this adapter. It said to use a new gasket and install it in the case. Thanks. That's very helpful. What do you think I've been doing all this time?
I had forgotten about the flange, or lip around the base of the gear housing. I assumed that it just slipped into the hole in the case. What happens when you assume? As I spent more time with it I was able to get it very close so I took a dead blow hammer and tried tapping on it gently and something astonishing happened. It moved. After a few taps it was almost all the way seated. AHA! It does not just "slip" into the hole, it has to be coaxed. So, here is a case where force, at least in a measured amount, is necessary to achieve the desired result.
This epiphany should have meant the end of this ordeal. Not so. For the nuts that hold the adapter in, three of them are fairly easy to get to. One of them, however, is anything but easy. It's kind of one of those things where you can see it or you can touch it, but you can't do both. I had to go over to the other side of the engine and snake my fingers in around the fuel pump, and the left mag, and a bunch of hoses and stuff, but I got the flat washer, the lock washer and the plain nut on the stud.
From here it was a relatively simple matter of tightening up the nuts a little bit at a time so that the adapter didn't get cocked in the hole but went in straight. Again, three of the nuts are easy to do this with. The last one has no room to get a wrench or regular socket on it. The only tool I could find that would work is a swivel socket and there is just barely room to get that on. As I was trying to tighten that, the socket got cocked on the nut and I couldn't get it to move at all.

As a side note, I was very pleased to see that in getting this image I also got a very good shot of the part number on the Vernatherm.
Ordinarily, it wouldn't be that big a deal to wrestle the socket off, but in this case, I couldn't get anything on it. I tried to get a screwdriver on it to pop it off, but that didn't work even a little. I tried grabbing the socket with a pair of vice grips, but they just kept popping off. I had already tried backing it off a little trying to unstick the socket and that didn't work. After spending entirely too much time trying to get this off, I figured the only option was to try to get the nut off and try again. After just a little bit of turning, the socket popped off the nut. AARRGHH!
Once that was done, it was easy to get all of the nuts tightened up by degree. This is one of those area where you have to use the German method of fastener tightening, just make sure that it is Guten-Tight. There is no way that I could get a torque wrench on those, so I had to use the calibrated elbow that I was issued in the Air Force.

While I am thrilled to have that behind me, it took entirely too long to accomplish. For one thing, this is what happens when you don't do this kind of work every day.
With that done, it was time to finish cleaning the gunk out of the hollow in the crankshaft. I'm a little disappointed in myself that I didn't get a picture right after the prop came off of the sludge inside. The best I could do was to get a picture this morning after getting the outer few inches cleaned but not the bit in the very back.

I had a hard time getting a picture with my phone because of the distance between the light for the flash and the lens. I could get the light in the hole or the lens in the hole, but not both, so I got out my borescope in order to get a decent picture. If you look closely, you can see that the front portion, what is visible on the extreme right side of the photo, was clean while the back was definitely not.
The reason that I only got as far as I did was the tool that I was using. I was using a plastic scraper, applicator that did a really good job, at least as far as I could get it in.

I know that somewhere in the hangar I have a cheap set of painters pallet knives, I just couldn't figure what what I did with them. Once again, Amazon to the rescue. I found a cheap set for about $5.00. I found that the No. 5 tool was just what I needed.


That did a good job of getting the larger pieces out and generally cleaning things up. In order to do the fine detail work I used long cotton swabs in a pair of holding scissors, what most people call hemostats, but when not used in the medical field, I think holding scissor is a more accurate description. It took some doing, but I was eventually able to get the whole thing nearly spotless.

That little tube thingy in the back made the whole process more difficult than it would have been otherwise. That is the passage where oil coming from the governor, through that line that goes from the adapter to the front of the crank case, enters the crank so it can act on the piston in the propeller to change the pitch. On the one hand it just gets in the way, but on the other hand I had to be careful not to get any of the debris in that hole.

In the end, I think I did a pretty good job getting it cleaned out. If I had wanted to, I could have made a career out of cleaning that. If I set myself a goal of working until I could run an alcohol soaked swab around in there and not come out with any gunk on it, I would probably still be working on it when the prop comes back from overhaul.
While I am very glad to have these two tasks complete and behind me, it took far longer than it should have to do it. I sure hope the rest of the tasks go a lot quicker than these.
Sunday 4/5/26 - I decided to start by cutting open the oil filter. I really want to get the oil change portion of the inspection completed. It was remarkably clean, but there were only 18 hours on it. I did find one very tiny, almost microscopic piece of metal. The magnet didn't pick it up. so it must not be steel.

At first, I tried to convince myself that this was just another speck of carbon, but under magnification, 10X and 20X, it didn't look black or like carbon at all. A while back I bought a cheap USB / Wireless microscope and decided to try it on this. It works about the way you would expect a cheap microscope to work, but it does connect to my phone via WiFi and makes taking pictures easy.

The microscope is supposed to be capable of 50X to 100X magnification, but I don't see how to tell exactly what the magnification you are looking at is.

That was the only piece I could find, so I don't really think it is anything to worry about, but I will keep enhanced diligence on future oil changes.
With that accomplished, I thought it best to start in on the most difficult part of the ordeal, I mean inspection, and that is the replacement of the engine mount Isolators. In order to get to the mount bolts, some disassembly will be required. The first step is to try to get the cotter pins out of the current nuts. Fortunately, Vans has gone to using metal lock nuts in this application, so I won't have to put cotter pins back in.

Today I was able to get the cotter pin out of the nut on the left lower mount. That too took entirely too long. As you can see above, there is very little room to get a tool in there at all. I had to remove the #4 cylinder exhaust tube and the #4 intake tube. I didn't mind the intake so much as I planned to replace the O-Rings on those anyway.
One thing this did is finally allow me to understand how the intake seals work. Way back a long time ago, Lycon modified the O-360-A1A that was obtained through Van's. As part of their modifications, they changed the intake tubes to use O-Rings at the cylinder flange rather than the stock Lycoming gaskets. It was discovered earlier that after this modification, the Lycoming gaskets won't work, they will leak. I knew that the tubes had been machined to received an O-Ring, but I feared that the cylinder face had also been machined so that if I got new cylinders, they would either have to be machined, or I would have to get new intake tubes. Fortunately, the cylinder face was not machined, just the tube.


Fortunately, the end that goes into the sump is standard Lycoming, so those O-Rings were easy to get.

One thing that getting the intake tube out did was let me get a better look inside the sump.

This airplane does not have a sniffle valve, so there is nothing to drain the sump. There is not a lot of liquid pooled in there, as some have reported, but the blue stains definitely indicate the presence of fuel. The sludge appears to be a mixture of oil and fuel dye.
The next simple step will be to get the cotter pin out of the lower right mount. Once that is done, the top ones should be much easier (famous last words).
No need to fret, the next exciting installment can be found here.


Comments