
RV-8 and the 2026 Condition Inspection Part 1, The Beginning
- Steve
- Mar 22
- 9 min read
Updated: Apr 4

Well, it's that time of year again. Time to hang up the flying shoes and dust off the coveralls and stop flying to do routine maintenance. I always try to plan it for a time when the weather is unflyable anyway and always manage to miss and end up down during some nice weekends. This year's inspection is going to take longer than usual since I have more work that needs to be done.
First and foremost, I need to have the propeller and propeller governor overhauled this year. Hartzell wants you to do it every 2,400 hours or 6 years , whichever occurs first, per HC-SL-61-61Y. The 2,400 hours occurred just a few hours ago, but the 6 years occurred a few times since it was new. I've gotten to the point that it is making me a bit nervous, so I am doing it this year. There is nothing wrong with the prop, it is not leaking or spitting grease, and it maintains RPM just fine, but it is getting long in the tooth. I figured that since the prop is coming off, the governor should also.
In addition to the prop and governor, I also need to replace the O-Rings on all four intake tubes, and do the Lycoming exhaust valve wobble test on all four cylinders. And the thing that I am dreading most is replacing all four of the Lord Engine Mount Isolators, but hopefully, it will be a little easier with the prop off. Basically, a lot more firewall forward work this year.
As is tradition, before beginning maintenance I went out to fly it first. It is necessary, after all, to get it up to operating temperature to drain the oil and do a compression check. Since it has to be done, might as well have lunch in the process. The pre-maintenance warm up can be seen here.
When I got back on Saturday 3/14/26, I started by doing a compression check and then draining the oil. I was a little nervous about the compression check as last year number 4 was showing lower than usual. Normally, it has been my highest cylinder and now it was the lowest at 68. Since one bad test doesn't necessarily mean there is a problem, I was going to check it again when I did the next oil change. I didn't. Hey, I got busy doing other things.
This time number 4 was back at 78. The lowest I had was 74 and that is normal, 3 and 4 are usually right around 75, give or take a psi or two.
The rest of that weekend revolved around getting the oil filter changed out and trying to finish up the oil change portion. I didn't quite get it all done, but came close. I still needed to check the finger screen.
Saturday 3/21/26 I came out early ready to tackle it. I pulled the snorkel for the air filter off and then got the finger screen out. I hadn't had it out since last year's condition inspection, about 55 hours ago. It looked really good with only some fine carbon bits in it.

I am not aware of anyone else doing this and I have no solid rationalization behind it, but I like to document what comes out after I remove it, mostly so I can compare from year to year and see how it goes.

Once cleaned, I went to put it back in. I got out a new crush washer and oiled it. I cleaned the area around the hole where it goes, got my tools ready, carefully inserted the screen back in its cave and put the hose / cap back on. In went in easily and I ran it down most of the way by hand. That was my first clue that something wasn't right.
Once I got it ready to tighten, it torqued right away, usually it takes several turns to get it tight. What happened here? Did I forget something? Hey, why is there nothing between the cap and the sump? Look over at the tool box and yep, there's the pretty new crush washer with clean oil on it sitting right there. Curses!
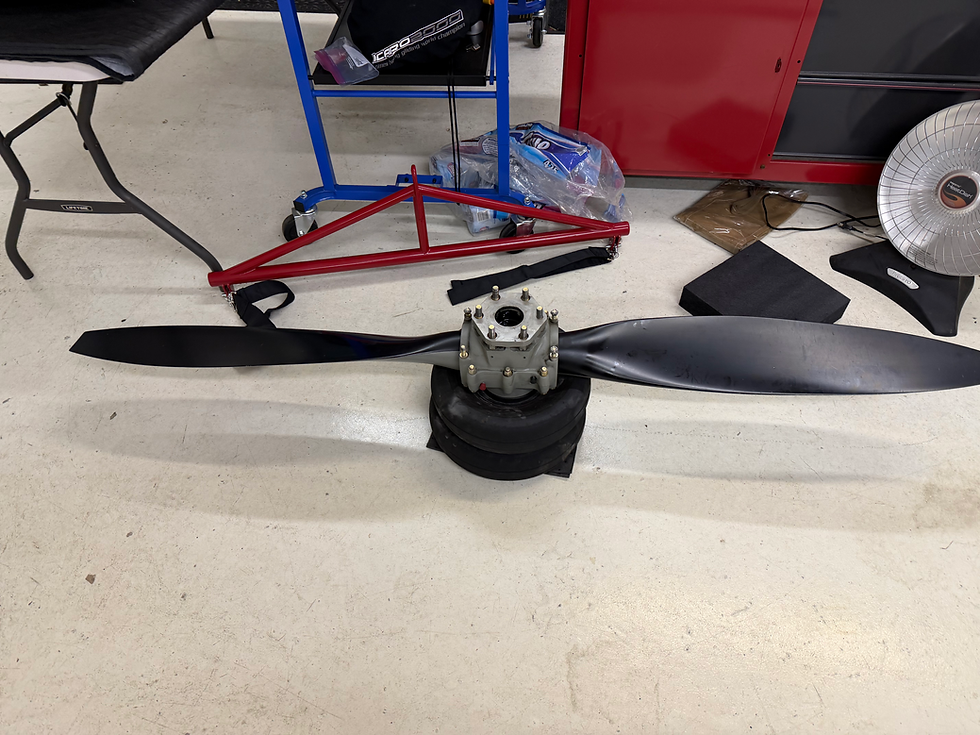
I had to pull it back out and start over. Once that was back in and tightened, I'll safety it later, it was time to get serious about removing the prop. I'm nervous about it because I have never done it with a constant speed prop before. I have done a number of fixed pitch props, but constant speed ones are different.
Thanks to an article I found in the information that Carl gave me when I bought the airplane, I learned about using a hoist to aid in the process. In fact, the Hartzell manual calls for using a hoist in their removal instructions. Oddly, they say to use a hoist rated at at least 800 lbs, when the prop weighs less than 100 lbs. Anyway, it just so happens that we have an engine hoist that should do the trick quite well. We also just happen to have a spreader bar designed to hoist a Sportsman. That should handle a prop.

The hoist is probably overkill, but it gives me confidence that maybe there is something that I can't drop.
It took longer than I expected to get the six bolts backed out. There is very little clearance in the area where they go so they can only be turned a very small bit at a time and they all have to be turned evenly.

It took a good bit of fiddlin' (technical term) back and forth, but we finally had all the bolts backed all the way out. From there is was pretty easy to get it off and put down. Fortunately I had my old tires from the last tire change still sitting around and they came in handy.
And now for something completely different... The Larch.
Now it's time to tackle the governor. It is going to be even less fun. It is buried on the back of the engine and is very difficult to get to. The inverted oil system certainly doesn't help.

Some engines have them mounted on the front of the engine near the #2 cylinder. There are probably draw backs with this set up as well, but it sure looks more convenient being right there up front. It looks like I am going to have to remove some things in order to gain access.
Sunday 3/22/26 - Governor - 1, Me - 0.

I started trying to get the governor out today. After moving or disconnecting a few hoses, I had reasonable access. I still can't quite figure out how I am going to get the bracket and cable off of the governor. I have removed the bolt from the rod end, but the cable won't come out of the bracket. I thought I could remove the bracket in place, but there isn't room to cut the safety wire, let alone get anything on the screws.
I had planned to solve this problem by doing it later. After getting the governor off the mounting studs, I would rotate it 90 degrees down so I had access to the back to cut the safety wire and remove the screws. Sounded good in theory.
I got the four mounting nuts and their associated washers off without dropping any into the waste oil bucket. Four nuts. Sounds simple, right? Not exactly. Three of them were easy to get to so, naturally, one was nigh on to impossible to get to. Fortunately, I have some experience with hard to reach hardware and I got it out. It is one of those that you can see or you can touch, but you can't do both.
Once I got all the hardware off, I wondered if it was welded to the case with age. Sometimes, old gaskets are happy where they are and don't want to let go. This one, however, let right go and the unit slid off the studs. Neato.
Then reality set in. It came off the studs no problem, but the it wouldn't come out of the accessory case.


There are actually two parts here. The governor and a mounting adapter. The governor is held to the adapter by the studs shown ion the circle on the left in the photo below. The adapter studs are what are showing and in the ovals on the right in the photo below.

Next I tried separating the governor from the mounting adapter, but that seam does not seem to want to let go. I don't want to use too much force because I don't want to damage anything.
The problem is the shaft that holds the gear that is rotated by the accessory case gear train.

There must be something that I am missing. I can't find a manual or a diagram oh how this thing goes in there, so I am not sure what is holding it up or what holds that shaft to the governor. For once, YouTube has failed me and I can't find a video of anyone showing how to remove this governor. I can't believe that the engine has to come off to get this out. It has to move forward at least three or four inches and that is more than can be gained by just loosening the mount bolts.
Help Mr. Wizard!
As an aside, this needed to be done anyway because the gasket between the adapter and the accessory case has been leaking for a while and is now leaking a good bit. I tried tightening the nuts a few years ago and that helped a little, for a while, but not anymore. Even if it hadn't been leaking, I can't just put it back together now and call it good or it would leak.
At the moment I am stuck. I hope that I learn something this week that will allow me to continue.
Epilogue - 3/23/26. Success! At least for now.
The Governator was winning through the early rounds, but I came back for a TKO in the ninth.
Carl came through with some useful information, as I knew he would. As I feared, I was trying to do it wrong. I shouldn't have separated the adapter from the accessory case, the governor needs to come off of the adapter. He found information for the MT governor that he has and their manual says "as the governor may adhere to the engine a plastic hammer can be used to move it".
I tried a soft face dead blow hammer and had no luck. There was a recess in the housing that looked it was placed there as a surface to pry on. The first couple of tries still yielded no joy, nothing wanted to move. Finally, I got out the GIANT screwdriver, the biggest one in my toolbox and very gently pried on it. Finally it broke free.
While that was great, I still couldn't get it to clear all four of the mounting studs on the adapter. Three would come off at once, but no matter how I rotated it, I couldn't get all four free at once. Finally, after holding my face just right, I was able to get it out.
Once free of the adapter, I was able to rotate it down and cut the safety wire on the screws holding the cable bracket on and get the whole thing loose. I will likely need to do the same thing in reverse to get it back in.

The only marking at all that I can find is the number 211952 on the inside of the housing. With my limited skills of Google-Fu, I was not able to find much. It appears that it might be a Woodward governor, but I cannot find anything about it specifically.

While I may have won the bout, there is a mandatory rematch coming up in the near future when I have to put it back in. I think that will be an even more hard fought battle, but I am confident that will ultimately emerge victorious, though it may go the distance and come down to a decision.

I found the gasket that was there a little odd. There is a screen built into the gasket, probably to keep debris from the oil system from getting into the governor and gunking it up.

Now that it is out of there, there is all kinds of room back there.

It's probably a good thing that I need to replace the gasket on the adapter anyway, because it looks like it should really be cleaned up before putting everything back together.

With that part done, it is now time to move to whatever is next.
Part two is here.


Comments