
Building the Rans S-21 - Episode 1, The Rudder - Pt. 2
- Steve
- 6 days ago
- 5 min read
Updated: 6 days ago
Last week, you remember, we had just finished getting the rudder frame drilled on the right side and everything ready for final preparation.

8/29/26 - At he end of last week's session, after deburring all of the holes and cleaning the parts, I hit them with the coating that I am going to use on this project. I am using a product called "ProtectaClear" made by Everbrite Coatings. It is a clear protective layer that is a very durable coating that keeps out water, prevents oxidation, seals, protects, and solves world hunger.
On most of the airplane, I will probably only coat surfaces that meet, like ribs and skins and such. It is self leveling and will smooth out nicely without any additional steps. It can be brushed or sprayed, they even include a sponge applicator with the package, though I prefer to use foam brushes. They seem to work well.
One other nice thing about ProtectaClear is that one can use solvent dyes to make any color one desires.

We had some blue green left over from earlier projects. I had toyed with the idea of trying to get something that would look a little bit like Zinc Chromate, but the 4oz. bottles are $26, which isn't bad, but shipping is $21. That isn't bad if one is ordering several bottles, but for one it is a bit excessive.
One nice thing about the dye we have is that it looks a little bit like the blue film that Van's puts on their parts. It's a pleasant color and looks nice. Just for giggles, on the rudder, which is one of the smallest parts, I was going to apply this to all of the parts, including the skin, just to see how it would look, and how difficult it really is. As I was cleaning parts though, and it was getting progressively later, and I still had to mask off all of the holes in the skin so that the stuff didn't bleed through to the other side, I decided that not everything needed to be coated. I still ended up doing both sides of the ribs and the inboard side of the spar. In truth, only one surface of two mating together really needs to be coated.
I had no guidance for mixing ratios with the dye. I didn't want to tint the whole can of ProtectaClear, so I poured a few ounces into a glass jar. I put in about half of a pipette of dye and as soon as I mixed it up I thought, "that's way too much".

It looked very dark in the jar, and as I began to brush it on to the parts, it looked very dark on the parts. I got in too big a hurry and brushed it on too think and then hung the parts up to dry so that the stuff left runs on the parts. ProtectaClear dries to the touch in about an hour, and additional coats can be applied after that time, but it takes 3 days to fully cure. There is a note in the instructions that the coating will be vulnerable, or something like that, until it fully cures. I've noticed that in the past after trying to assemble parts after it was just dry to the touch, is rubbed off pretty easily.
When I came back on Wednesday, however, and it was fully cured, I thought "Wow, that looks really good". It ends up being just about the color blue that I was looking for.
All that is left now is to put everything together. As mentioned in Part 1, I wrote my own instructions to see if it would work the way I wanted it to and I was pleased to see that it did. The Rans instructions are here, and my instructions are here.
The first thing to do after riveting on the hinges was to cut a couple of pieces of tubing to use as spacers for the rudder stops. The instructions say to "Fabricate rudder stop bushings as shown in Parts Manual Drawing".

The problem with that instruction is that is basically just tells you where they go and that the builder has to cut to size. They don't specify what size. Well, OK, we have the technology to overcome.
The first thing I did was take an inside caliper to get the distance between the hinges.

Next I transferred that dimension to the raw stock provided.

After making a mark, I had to figure out how to cut it. What they supply is thin walled aluminum tubing. The Outbound 300 guy said that he used a parting off tool on his lathe to cut them. Great idea, for one who has a lathe handy. After looking at the supplied tube carefully, it was obvious that it had been cut with a tubing cutter. I can do that, we have just about every tubing tool that an amateur builder can have.
After digging through the tubing tool box a little I found a miniature tubing cutter. It's really a cute little thing and it worked out quite well. The blade is sharp enough that it is pretty easy to get it lined up perfectly with the mark.
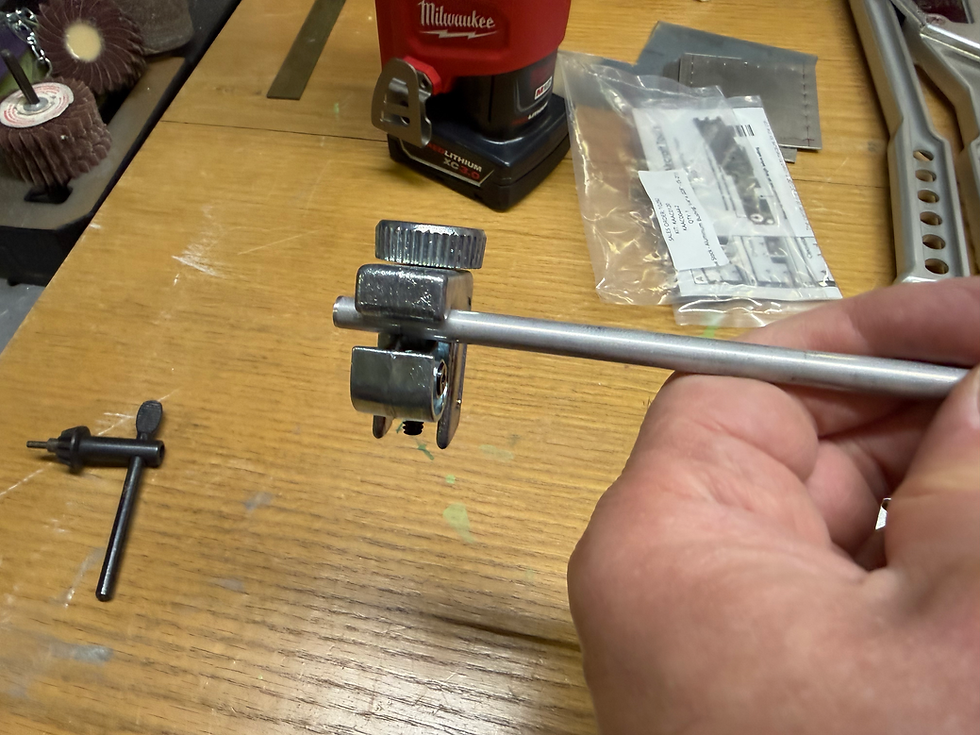
After cutting, there is a little bit of a burr at the cut end. Also, just to be on the safe side, I cut it a couple of thousandths longer than needed. From there, it is easy to chuck it into a drill press and use a piece of sandpaper to trim and smooth the ends.

After those were installed, it was time to start riveting things together. My plan was to use AN470 solid rivets in place of the Cherry AAPQ-XX blind rivets supplied in the kit whenever possible. I just feel better with solid rivets, I'm sure the Rans design is fine.
The first thing to do was to rivet the rudder horn stiffener to the bottom rib. I keep trying to put that rib in upside down and put the doubler on the wrong side, so I had to check back with the plans frequently to make sure I had it oriented correctly. After spending a lot of time digging out riveting tools, my squeezer, the correct sets, a rivet gauge, the correct rivets and all of that, I was ready to set the first rivet. After all that, I didn't like the result.
The material being joined here is very thin and the force of setting the rivet was deforming the parts. Not a lot, but enough to be noticeable. I then tried one of the rib to spar rivets to see if that would work better and I got the same result.

In the photo above the damage doesn't look too bad and it probably isn't. When going through this on my RV-7 years ago, I remember Van's mentioning that the rib flanges (wing) would likely deform a little and that it was OK and didn't hurt it structurally. In this case I decided I didn't like and threw in the towel and decided to be reasonable and do it their way.

Using their rivets the flanges stay straight and flat against the spar.
With that being accomplished, it was time to put the frame in the skin and get going on riveting it all together.

That's a wrap for the rudder. Now it's just a matter of taking it upstairs to store for the next few years while I build the rest.
Next on the list, the vertical stabilizer. See you then.


Comments