
RV-8 and the 2022 Condition Inspection
- Steve
- Apr 24, 2022
- 19 min read
Updated: Aug 4, 2025

3/12/22 and 3/13/22 - It is once again that time of year, time to take the airplane out of service and do the annual inspection. Technically it isn't due until May, but that gets pretty close to better flying weather, so I wanted to do it earlier to get it out of the way.
At the very least I need to get the oil and cylinders warmed up so I can do an oil change and compression test. I was going to fly for about an hour because I wanted to land with minimal fuel as I have to do some work that would be easier with very little fuel in the tanks. As it was, it was extremely bumpy on that Saturday and I chose to end the flight early. I ended up landing with just under 15 gallons of fuel.
Another reason for starting earlier is that there is a lot I want to do this year, so it will take longer than usual. Beyond the usual stuff, I also want to:
Remove the right wingtip for repair.
Have some repairs made on the lower cowl.
Remove the AV-30 and send it out for repair / upgrade.
Do a piston flush Per Savvy Aviation's oil control ring solvent flush procedure.
Install stiffeners in the tail per Van's SL-00014.
Replace the main battery.
I started with the compression test. The results were interesting. All results in the 70s, but #1 which was my lowest cylinder last year was the highest this year. Number one was really low last year, in the low 60s. Carl told me about a technique his mechanic had used in the past when one suspected a stuck ring with good results. He squirted a bunch of Marvel Mystery Oil in the cylinder, let it set for 20 minutes or so, drain the oil, take it out and run it, then test it again. I did that and got a result of 74. This year it was 78. I think I will try that trick with the rest of the cylinders and see what happens. Of course, it is possible that it was a fluke and not related at all.
Next I moved on to draining the oil. This is never a task I like. I have the Christen Inverted Oil System and there is very little access between the engine and firewall. I do have a quick drain, but for some reason a quick drain does not work on this sump. On previous engines I have had, the quick drain would drain the sump in about 20 minutes. On this engine it took over 24 hours. I tried using a different drain valve but had no better luck.
The oil is drained from a Tee in one of the inverted oil tank lines coming out of the sump and is in a very bad location. I have to use a Form-A-Funnel to channel the oil into a container. I have done it enough times now, however, that I can do it pretty quickly and not make a mess.

In order to make draining the oil easier in the future, I copied the setup on Carl's airplane by pulling the drain plug from the front side of the oil sump and installing a fitting that will allow me to more directly drain the oil. No extra equipment required. This location is actually intended for use on airplanes with training wheels and in order to get all the oil out I have to lift the tail,but that is much easier than the current set up.


The next simple step is to get the oil filter drained and removed. This is not too hard because I have a tool that Van's used to sell to put under the filter and catch the oil and channel it into a hose that takes it down to the drain pan. Unfortunately, Van's doesn't sell this tool any more.


This procedure is made harder on my airplane because the propeller governor is right where this tray should go. It is possible to thread it in, but it is a trifle difficult and takes a few tries to get in correctly.
Next it was time to pull the suction screen and inspect it. On many airplanes this is a very easy task. Not so on mine. Again, a fitting for the inverted oil system goes into this opening. There is a swivel type fitting that the hose is attached to allowing the cap to rotate with the hose still attached. The drag from that fitting makes it impossible to turn the cap by hand, so I have to hold a crows foot in my hand to be able to turn it.

Because of the hose on the fitting it is difficult to get the cap far enough back to get the screen out. Also with the drag on the fitting it is harder to tell if the screen is back in correctly. I have crushed one so far. That's no huge deal, they are pretty cheap, at least as airplane parts go.
Once all that was back together, I removed the snorkel and air filter so I could clean and re-oil the filter element. At least that is pretty straight forward and easy to do. Since the filter element has to thoroughly dry before it is re-oiled, I usually let it set for a week and re-oil it the following weekend.
3/18/22 though 3/20/22 - Next I did all of the inspections on the whole engine and surroundings. Fortunately, I didn't find any problems in this area. Everything looked good and was tight and in place.
I had been having some difficulty getting hold of the person that I was hoping would do the fiberglass work on the wing tip and lower cowl as mentioned above. I figured this would be the longest piece of down time, so I wanted to get it started as soon as possible, but after the second week I still didn't have an idea of how it was going to get handled. More on that later.
When I pulled the wheel pants off I was surprised to see that the left main tire was considerably more worn than I had expected. These are Desser retreads (p/n 30842-RE / 500-5 6 PLY RTO), an earlier version of which had been on Carl's airplane for several hundred hours. I had installed these 2 years and 147 hours ago. I expected to get more life out of them. The left tire wears faster that the right, so after a while I swap the wheels left and right to try to even out the tread wear. I didn't do that early enough this time.
By the time I got to looking at it, the outside tread was down to 1/32" tread depth left. The right one was about 3 times that. Great, now I have to flip the tires on the wheel. Since they only wear on the outside edge, the inside stays new. By flipping the tire, I can get twice the life out of a tire. It is not hard or difficult, but it is messy and dirty and requires a lot of time on the floor and I hate doing it. I was hoping to put it off until next year, but it has to be done now.


During the week between the second and third weekend of work I heard from the guy that I was hoping to fix my fiberglass. He said he was willing and to bring them on over. The only problem was that in his new shop he didn't have the ability to paint at the moment. Fortunately there is a world class painter right next door who I was hoping I could get to do the paint. I had a hard time getting hold of him, but he did call me back and agreed to look at it, so I should have new paint once the glass work is done.
I won't say anything about why the wing tip needs to be repaired other than that the pilot didn't pay attention to where he was taxiing once. Once is all it takes sometimes. The bottom cowl has some cracks in the corners around the outlet area. For a 21 year old airplane with almost 2,250 hours on it, this is still pretty small amounts of repair work needing to be done.


Once I dropped the parts off for repair I came back and re-oiled the air filter. Once that had set for about a half hour I put it and the snorkel back on.
After that I timed the mags (LASAR), and was surprised and gratified to see that they were bang on and needed no adjustment.
Next I was going to do the piston ring flush but when I read through the instructions again, I decided not to at this time. One thing they warn against is that the solvent may soften the O-Rings in a quick drain valve and I didn't want to take a chance on them getting soft and leaking. I would have just pulled the valve out, but where it was located all the gunk coming out would have gotten all over a bunch of stuff under the opening and I didn't want to disassemble half the airplane to make it work. What I need is a fitting with a hose barb on it so I can run a hose into a bucket to catch what comes out. I will try to have that available at my next oil change and do it then.
Since I'm not going to do the flush, it is time to put the oil back in and while the oil bottles were dripping (I let each one drain for about 10-20 minutes) I safetied everything I had taken off.
3/25/22 through 3/27/22 - I had a pretty severe leak in my #2 cylinder rocker box cover (and maybe #4, I wasn't sure), so I replaced the old gaskets with new REAL silicone gaskets a few weeks ago. I only did #2 and #4 at that time and decided to do #1 and #3 now. Number one was easy, no problem. When I got #3 off, I found a hunk of plastic stuck to the side of the rocker box cover. When I looked at the shaft that the rocker arms pivot on, there was bunch of carbon and gunk in there. I found another piece of plastic also. Great, now what?

Turns out the "hunk of plastic" is the Thrust Button that is supposed to be in the ends of the rocker shaft. It appears to have broken off for some reason. Now I have to place another order with Aircraft Spruce and wait until next weekend to put that back together. After that I was pretty frustrated so I called it a day early.


3/25/22 through 3/27/22 - The Thrust Buttons fit less tightly than I thought they would. I was also surprised to find that what I thought was a dimple in the middle is actually a hole.
After freaking out a little, I pulled the cover back off of #1 to check it, but those were still new looking, except for being a brownish color. So, apparently there is something about #3 that caused it to happen just there. I'll keep an eye on it from now on.
The next morning I cleaned and rotated the spark plugs, finally, something that went according to plan. They all passed resistance test and cleaned up nicely. Of course, they are only a year old with only about 75 hours on them. Before I put the plugs back in I took some pictures of the valves. They look pretty good to me.


Cylinder images taken with a Teslong Articulating Borescope.
I then removed the spinner and inspected and serviced the prop (Hartzell), then put the spinner back on. Once I get the thrust buttons installed and the rocker box cover back on, I will be finished firewall forward.
4/2/22 through 4/3/22 - With Firewall Forward more or less finished, I moved on to the next task, replacing the main battery. Since it is behind the rear baggage compartment I wanted to wait for the Condition Inspection since it has to come out anyway to check the battery and lube the elevator bellcrank behind it. I was not looking forward to this task because I hate working back in the tail cone. Of course, having the tail lifted so the fuselage is closer to level helps out a lot.
As it turns out, it went a lot smoother than I expected it to. I'm not saying I want to do it every weekend, but I was pleasantly (this time) surprised.


Once I had the rear baggage compartment back together I inspected the rest of the aft fuselage / empennage and didn't find anything out of line. Once I clean and service the tail wheel, I will be done from the cockpit aft and firewall forward.
With that done, I moved onto the rest of the aft fuselage and tail. Inspected and lubricated all of the tail feathers and hinges, found no discrepancies, but didn't expect to. From there I moved to the forward fuselage / cockpit area. I lubricated all the controls and looked everything over and again, didn't find anything.
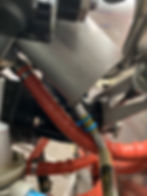
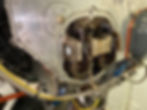
4/9/22 through 4/10/22 - The one thing I wanted to do in this area was to repack the fuel selector valve. There are 2 O-Rings in there (MS29513-018 and MS29513-011) and as near as I can tell, it hasn't been serviced since it was installed, other than to squirt some lubricant on the shaft now and then. At first, I thought it would be a pretty easy task to pull the shaft out with the valve in place, but as I got more into it, that didn't turn out to be the case.
I thought I could just pull up the carpet and the floor panel over the selector valve and unscrew the cap and pull the shaft out, but I forgot about the cross piece that the valve is actually mounted to. I thought the cap would extend though that piece but it doesn't. Turns out, I have to remove the valve to get it apart. Since it is 20+ years old, if I had known I needed to remove it I would have just put in a new one, they aren't that expensive.

Since I now have to loosen all three fittings I put some paper towels under the valve to catch any remaining fuel in the lines. I only have about 6 or 7 gallons in each tank, so the fuel level should be well below the level of the valve. I already pulled out the gascolator, so that drained all of the fuel above it, there was just a little bit in the line between the valve and the gascolator.
As if that wasn't enough, I quickly found out that those mount bolts don't go into nut plates, they are just regular Nylock nuts. Because of where they are mounted, it was very difficult to get my hands in there to get tools on the nut and the bolt, but I was able to do it. As I pulled the valve out, I heard something drop. Hey, I have all the nuts and washers, what was that? It was a spacer. A spacer! Where did that go? I didn't see a spacer when I started. Fortunately, it was pretty obvious where it went. What was not so obvious was how in the world I'm going to get that back in there. Hey, why is there only one? Oh, wait, the other one is under the paper towels that were under the valve.

Once it was on the bench, taking it apart was a piece of cake. It is probably a good thing I did this. There was nothing leaking, but the O-Rings were obviously old and pretty well worn.

Once it was cleaned up and new O-Rings were installed, reassembly was pretty straight forward. Getting the valve back in wasn't a lot of fun, but it was doable. The forward bolt and spacer were pretty easy to get in, but the aft one was a bear because my hands just don't bend in the direction they need to to be able to reach it. I eventually got it in with a long pair of forceps.
With that back together, the fuselage is finished. All that is left is Landing gear (tail and main) and wings (plus getting the AV-30 back from uAvionix and the cowl and wing tip back from repair/paint).
4/16/22 through 4/17/22 - I start the landing gear with the tail, since it is the easiest. Landing gear is probably my least favorite part of any aircraft maintenance activity. It is not hard, it is just dirty, nasty, grimy work that usually requires a lot of bending down and getting back up and crawling on the floor, particularly with a low wing airplane.
There is really nothing to the typical Van's tail wheel set up. There are very few moving parts and not a lot to disassemble, clean and lubricate. I have the JD Air Dual Bearing Yoke which uses ball and needle bearings int he yoke. It is superior to the plain bushing type and is pretty easy to maintain. This time around I'm trying the Flyboy Accessories Deluxe Tailwheel Tire that Carl had. He had a bit of shimmy with it on his airplane and I am going to give it a try. It is slightly larger than the standard Light Weight Tire and a little softer so it rolls more smoothly. It doesn't quite sound like the aft end of the airplane is being ripped out every time you roll over a concrete seam. The bushing through the bearings that the bolt goes through does seem to be just a little too small and there is a small amount of play even when the axle bolt is properly tightened up. This may lead to some wobble. We'll see.


Next come the mains. For no apparent reason, other than that is the way I usually do it, I started with the left wheel / tire assembly. I figured I was going to have to replace the brake pads this year since I haven't done it in a while, but they are still in good shape with at least 2/32" (or possibly 1/16") of material left and both sides are wearing evenly. I wasn't planning on repacking the wheel bearings because I did it not too long ago, but when I go them apart, the grease was pretty old and dry looking, so I cleaned and repacked them. The brake disc also is holding up well and not really wearing between the times I measure it. With the wheel / tire reassembled, it was a matter of cleaning the axle, caliper pins and looking everything over and put it all back together. With that done, the right one went just the same, but on the other side.
4/22/22 through 4/24/22 - From here it was a matter of cleaning up the wheel pants and putting them back on. Then came the wings. Since I had done a good bit of work in the wings a few months ago cleaning up corrosion on the aileron push rods, there wasn't much to do except give them a good looking at and take some pictures of the inboard aileron attach brackets per SB 16-03-28. I like to take pictures so I can look at them over time in case there is ever a question. So far, there hasn't been.


With that done, my condition inspection checklist is complete and I am essentially finished with this year's inspection. Since I still don't have my wing tip and lower cowl back from repair, I took the time to comply with SL-00014 by installing some stiffener angles to the aft lower fuselage. I ordered the angles from Van's to have on hand and set about this as a final task for this year.
I am always nervous about drilling holes into painted structure as it is very easy to chip the paint. In this case, not only were holes drilled, but they had to be dimpled, which pretty well guarantees paint chippage. I managed to drill the holes without any major chipping, but the dimpling process did very much break the paint loose around the dimpled holes. Using rivet tape to try to protect the paint, just made it worse. I have put some vinyl tape over the rivets to try to keep the paint from flaking off. Of course, if/when I ever pull that tape off, the paint will come with it. For a 21 year old paint job, it has held up very well (primarily due to the previous owner), but some touch ups would be a good thing to work into the schedule someday.

I had a little bit of trouble marking the holes for the ends of the angles as shown in the Service Letter because the only compass I had to use had a pencil that didn't really show up on the paint. I would have liked to use a sharpie, but I didn't have anything to hold one that would give me the measurements called out for. I very carefully marked the intersection with a sharpie that I could see.

Because I have a very hard time getting a hole started exactly where I want it, even with a good center punch, I start the hole with a center drill which is designed to not wander when getting started. Once that is started, I finished the hole with a regular #40 drill.
For work like this, where I want a piece held pretty firmly in place, I don't like to use Clecos as they don't hold tight enough. For this type of work, I prefer to use skin pins. They can be tightened up better and hold more precisely.

In order to drill the hole at the bottom end, I don't trust myself to be able to hold the piece by hand and keep it still enough to get the hole where I want it. This is where a good assortment of many different clamps comes in handy.

Once the two end holes are located and drilled, drilling the remaining holes is pretty easy. Drilling the center hole next and adding a third skin pin makes it easy to do the last two.

Once the holes were drilled from the outside, it was time to make sure that it fit on the inside. It fit perfectly at the top with no interference from the bulkhead, but at the bottom it was hitting the bulkhead and the longeron, so it had to be trimmed until it fit without interference. Fortunately, that was pretty easy. After they were fitted, it was time to deburr, dimple, smooth, clean and prime them.

As stated previously, trying to use a piece of rivet tape to protect the paint, didn't work so well. I had feared that bucking these rivets would be somewhat difficult due to the relatively small space in which to work and the angle of the, well, angle, but as it turned out, it was not so difficult after all. The bottom hole did give me some difficulty because it didn't seem like anything I had would fit between the lower longeron and the flange on the angle. Again, this is where a wide variety of riveting tools comes in handy. I just happened to have a small piece of steel that could be laid on top of the longeron and held with my finger tips that would just clear the flange of the angle. Those rivets were set much better than I had hoped for.

As you can see in the picture below, I ended up with more paint chips than I had hoped for, but with the judicious application of vinyl tape, coupled with the fact that it is down low under the horizontal stabilizer, I doubt too many people will see it and comment on it.


Doing the right side, as would be expected, turned out to be a little easier and go a little quicker once I had already done it once.
5/13/22 - 5/15/22 - Even though I finished up the inspection, and other related maintenance activities 2 weeks ago, I still couldn't do anything else because I hadn't got my fiberglass parts back from repair yet. The painter ran into some unexpected difficulties and it took longer than expected. There were some starts and stops throughout the week, but I finally had the opportunity to pick them up Friday afternoon.
While I waited to be able to get the wing tip and cowl back, I still wanted to get the AV-30 basic setup re-accomplished and roll it out and run it up and check for leaks so I would be ready to put the cowl back on as soon as I got it. The AV-30 setup was as expected, but getting ready to run the engine gave me a bit of a start.
Since I had all of the fuel drained out of the system from the tanks to the flow divider, I wanted to disconnect the lines at the injectors and put some small cups up there and run the pump to make sure I had fuel all the way up to the cylinders (takes some of the guess work out of knowing how much to prime for that dry start). It's actually a good thing that I did. In so doing I discovered that the injector on the #2 cylinder was loose. Not real loose, but when I tried to loosen the fitting, the whole injector turned. It took a bit to get it tight again. I don't think it was loose enough to leak, but it wasn't tight.
When I put my cups in place and turned on the fuel pump, no fuel came out. Uh-oh. Well, I did drain all of the fuel out of the lines, maybe it will take a few seconds for fuel to get there. A few seconds later. Nothing. Try switching tanks. Nothing. Ruh-Roh Reorge.
Since I had the fuel selector apart, I thought maybe I put the Teflon valve back in backwards. I didn't think so because this had worried me when I put it back together and I was very careful to get the orientation correct.
Next I tried to see if there was fuel at the gascolator with the pump on. Yep, good solid flow, lots of fuel. OK, definitely getting through the selector valve. OK, so what could be stopping it between the gascolator and the flow divider? Hmm?
Have you figured it out yet?
You bet, I had the mixture at idle-cutoff. Doh. Move the mixture control... Fuel flow. OK, it is never good to have the brain in neutral around an airplane, no matter what you are doing. Took it out, ran it up, no problems, no leaks. Now, lets go get the parts.
The cowl and wing tip were definitely worth the wait. They look great. In the end, instead of a touch up they were completely repainted, and they look it.

The wing tip isn't as dramatic because I didn't show the full damage in the beginning, but it looks as good as, or better than, new. It turned out the damage was not structural, just cosmetic. It was just the paint and gel coat that was gouged, cracked.


It was just filler that had cracked before, so it too wasn't structural, but he added about 5 layers of glass to the corners. This thing is not going to crack again.
It is really nice to have it back in one piece again. The last time I flew was March 12. Now, if we could just get the weather to cooperate.
Here is the Inspection Checklist I use.